My setup
Over the past year I have acquired various pieces of equipment and computers and it has quickly turned into a hodge podge of lots of interconnected devices which I realized I had no visibility into. First, I will say you don’t need a lot of fancy equipment to get started, you can do a lot for very cheap and checking what capabilities you already have on your equipment at home. This turned into a passion project of mine to create a home lab that had everything I could get my hands on for free or low cost. Below is a list of my equipment and also a network map I created of my network:
- PC – 64gb RAM, NVIDIA 3060, 2x 2TB NVMe, Intel i9 12th gen
- Old gaming laptop (Turned into a Proxmox Server) – 16gb RAM, 500gb ssd, NVIDIA 2060 ti, Intel i7 8th gen
- Raspberry Pi 4 (Suricata IDS)
- Unifi Dream Machine Pro Cloud Gateway
- Unifi U7 Access Point
- Unifi 2.5GB 5 port Switch
Below is a picture of my network

How It’s Connected
I use a Unifi Dream Machine Pro cloud gateway between my modem and the rest of the network. I really like Ubiquiti’s clean UI and how it allows me to over see my entire network, I can create VLANs, capture packets, create internal honeypots, and a lot more. I just added the USW Flex 2.5Gb Switch when I realized the Dream Machine could not do port mirroring (unfortunate considering all its capabilities) and I would need to have a mirrored port for my Suricata IDS set up.
A small side note here, my switch is placed after my dream machine hence I am not capturing anything that comes from the internet to my dream machine and back out. I have thought about placing another switch between the dream machine and my modem and putting my pi 4 on that switch instead.
My switch has 5 ports, 1 is connected to the Dream machine, the rest are used by my PC, my wireless access point, my raspberry pi 4, and my Proxmox server.
My PC and my Proxmox servers host a variety of VMs that I use for pentesting, threat detection, and various other projects. The most important VM though is my Wazuh SIEM hosted on my Proxmox server. My wireless access points hosts all connected devices in my house and are separated by VLANs for devices such as TVs, cameras, phones, etc.
Wazuh SIEM & Syslogs
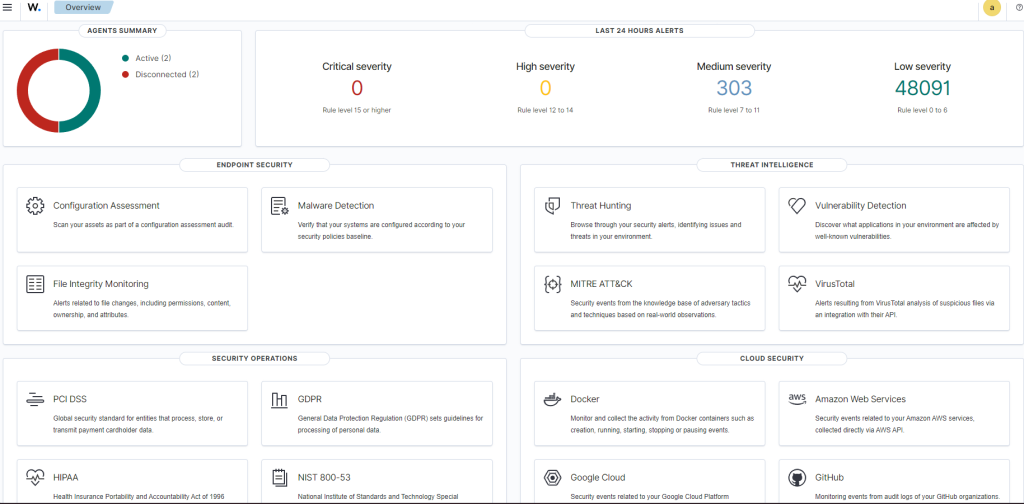
Before I talk about the Suricata IDS, I wanted to talk about my Wazuh SIEM and how I have deployed it within my network. Wazuh is a free open source SIEM which you can download here https://wazuh.com. It is a great tool for learning and deploying the SIEM is pretty straightforward, all you need is an Ubuntu machine and to run some commands and boom you have a Wazuh Server set up. They have a very easy to follow quick start guide on their website. They also have agents that can be easily installed on Windows, Mac, and Linux. Below is a screenshot of my Wazuh dashboard (There is a lot of tuning that needs to be done):

I have configured my SIEM to receive syslogs from my dream machine pro, all suricata alerts, as well as deployed agents on all hosts on my network. There is a lot of work that needs to be done for the SIEM but I will save that for another post.
Suricata IDS
As part of my threat detection project I decided to use my old raspberry pi 4 as a Suricata IDS that would mirror all traffic that comes in and out of my switch. Suricata is an open source IDS/IPS that is widely used in threat detection, you can find more info here https://suricata.io. I decided to go with an IDS instead of an inline IPS because I didn’t want to slow down my network. So I had all traffic mirrored from the Dream Machine Pro port to the Raspberry pi. This would allow me to keep my traffic speeds the same and would only be resource intensive on the raspberry pi itself.
Challenges with the IDS
There were some challenges setting up this IDS to get the logs sent to the SIEM. First, when I set my ethernet port on my switch to mirror mode I could no longer SSH into my raspberry pi because the only traffic it was receiving was the mirrored traffic. Once I realized this, I enabled wifi on my pi so now it had 2 IP addresses, one that was used on the ethernet port eth0 and another on the wifi wlan0. If you look at the network map above you can see how it works. Now that I had established connection again I had to get the logs sent to the SIEM.
After a lot of trouble shooting (and ChatGPT was no help) and a lot of documentation reading, I finally figured out how to send the logs to the SIEM. If you have specific logs on a host that you want to send to the Wazuh SIEM you must edit the ossec.conf file as root or administrator. The following is a screenshot of how I added my logs to the configuration file, on my Pi I switched to root user and edited the following file (use vi or nano):
/var/ossec/etc/ossec.confOnce in the config file I added the following snippets under the <ossec_config> section:

Now that I had edited the config file I had to restart my Wazuh agent on my Pi so the changes would take effect. I had to test whether or not the SIEM would actually receive logs from the pi to include my suricata logs. So, I created a test rule that would check for ICMP pings on the network and create an alert if it detected any. Below is the rule that was added to the suricata rules file:

The rule simply alerts if any IP pings another IP whether internal or external and will then display the message Test ICMP Detected. So let’s test it, I am going to ping from my PC to my gateway to also test if the pi is receiving the mirrored traffic:

We have 2 successful pings now lets check the Wazuh dashboard to see if it is receiving the logs.

This is just a snippet of the alert but it looks like the SIEM is successfully receiving Suricata logs from the eve.json file.
Honeypots
I have two honeypots that are deployed, the first is an external honeypot deployed on AWS. This honeypot collects a variety of SSH attacks, Web app attacks, malicious download/uploads, and more. For this I use Dshield honeypot which is an open source honeypot written by the Internet Storm Center team at SANS. Here is the github page which gives a variety of ways to deploy it (raspberry pi, AWS, etc) https://github.com/DShield-ISC/dshield. I had to deploy mine on the cloud because my ISP does not allow me to host stuff on my DMZ publicly. This is a great free resource that can help deepen your knowledge on various types of attacks.
I also have an internal honeypot to add an extra layer of detection on my home network. For example, my internal honeypot with alert to any kind of scanning activity on my network. If I were to run an Nmap scan on my network I would get the following:

Now these logs I have not yet been able to integrate into my SIEM but that will be something I look to do in the near future.
Conclusion
This was not an in depth write up of how to set up these tools or what I am doing with them. I just hoped to give someone some ideas of what they could start to do with their home network. In the future I will look to do an in depth write up of rule creation with Suricata, also integrating Yara, and doing more fine tuning on my SIEM.


